- On the modules page, select “CRABS”.

- You are directed to the trip register page. It consists of 3 sections: Open trips, Closed trips and Sent trips. To create a trip, click on the “ADD TRIP” button.

- Page 1 provides general trip information. Some information is filled in automatically from your parameters, but you can modify it if necessary.

- This is the case for the crew register. If one of your helpers is absent, you can delete it by clicking on the “REMOVE CREWMAN” button. It will only be deleted for this trip.

- Indicate whether “YES” or “NO” you have an observer on board.

- When you have completed all the fields, go to the next page by clicking on the “NEXT” button.

- Page 2 provides information on DEPARTURE.
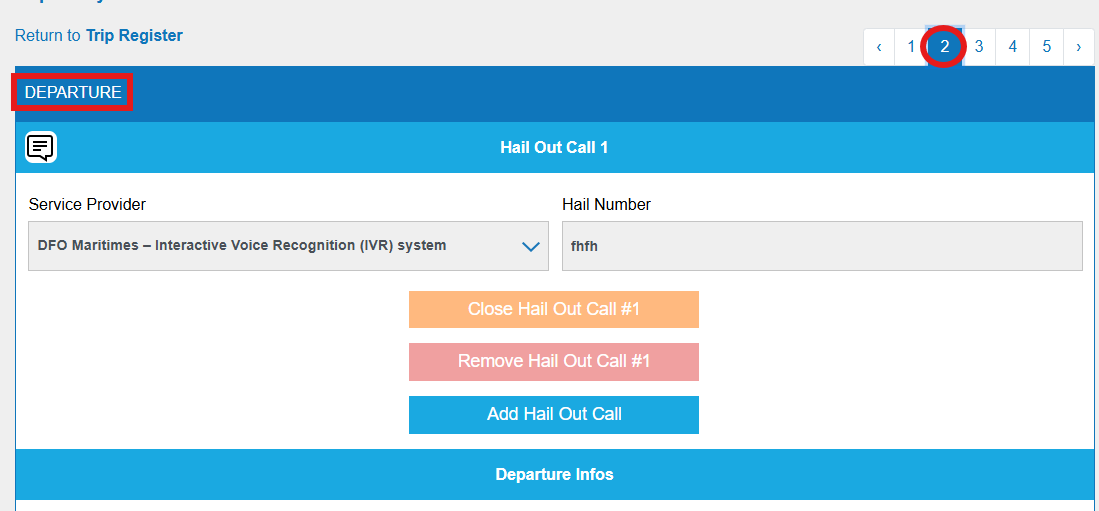
- The “Service provider” is automatically filled in from your settings, but you can modify it by clicking on the blue arrow. Then enter the “Hail number” provided by the company.

- Enter your departure date and time by clicking on the “Automatic clock” button.

- You can change the date and time manually. On your phone, click in the time field, the clock appears: choose “AM” or “PM” then enter the start time, and click on “Configure” to save the data.

- The starting port is automatically filled in from your settings, but you can change it by clicking on the blue arrow. Choose the right port in the menu which appears. Click on the “NEXT” button to go to the next page.

- Page 3 provides information about your fishing EFFORT.

- The gear details are filled in from your parameters but you can modify it.

- Complete the other information requested: Date and time, GPS position, soak duration, average gear depth…

- Fill in your catch information in Kg or pounds, and JOBEL will convert it.

- If you have Bycatches (that you cannot keep), indicate this by clicking on the “Add Bycatch” button.

- Fill in the fields requested: species and quantity discarded.

- If you make several Tows during your fishing effort, click on the “Save Tow 1” button.

- A box showing the first is displayed. Click on the “ADD TOW” button and fill in the required information as you did for the first tow.

- Then, complete the End of effort information. Click on the “Automatic clock” button to enter the date and time.
Then answer the questions about interactions with a species at risk, a marine mammal, and whether you have lost any of your fishing gear, as well as the inactivity report.
For the period of inactivity, check your fishing licence if you must declare this periode if you have an inactivity during your fishing trip.

- If you answer “YES”, a message will appear asking you to complete the form that will appear on the following pages (see visual guides for declaring interactions, gear loss and inactivity reports).

- If you make more than one fishing effort during your trip, click on the “Save effort 1” button.

- On the page that appears, click on the “ADD EFFORT” button.

- The effort page appears on the screen. Fill in the information as you did for the first effort.

- When you’ve finished to complete your efforts, click on the “NEXT” button.

- Page 4 concerns the Bait section. The bait type is filled in automatically from your parameters, but you can modify it by clicking on the blue arrow. Complete all fields.

- Page 5 provides information on ARRIVAL: arrival call and personal uses.

- In the Hail in Call section, the Service provider is filled in from your parameters, but you can modify it by clicking on the blue arrow. Enter the Confirmation number. The summary noted above is the information to be transmitted to your provider when you call.

- If you are keeping catches for personal consumption, please indicate this by clicking on “ADD PERSONAL USE”, and fill in the information requested: species, weight and forseen usage. If you have more than one species to declare, click on the “Add Personal Consumption ” button.

- When you have finished filling in the pages of your trip, click on the “REVIEW” button.

- You’ll be taken to the Trip data page, which summarizes all the information you’ve entered. Check that all the data you have entered is correct, as you can still modify it.

- If you have made a mistake, click on the “EDIT TRIP” button at the bottom of the page.

- You are redirected to the first page of the trip. You can go directly to the page where you need to make a correction by clicking on the numeric strip at the top right of the screen, or by clicking on the “NEXT” button at the bottom of the page until you get to the right page.

- If you’ve made a mistake about the amount of bait used, go to page 4, make your correction, then click on the “NEXT” button to go to the last page of the trip. And click on the “REVIEW” button to return to the data page.

- Now that your trip information is correct, click on the “CLOSE TRIP” button.

- Click “YES” to confirm trip closure.

- Your trip is closed, click on the “OK” button.

- Your trip will appear in the CLOSED TRIP section. Click on the “LANDING” button.

- Indicate the date and time of your arrival at the wharf, then the date and time of the beginning of your landing.

- The Weighings section lets you record your dockside weighing (which is not sent to DFO) and adjust the quota indicateur. You can see the progress of your quota in real time.
Once you’ve entered your landing data, click on the “CLOSE LANDING” button.

- If you have a good Internet connection, click on the “SEND TRIP TO DFO” button.

- If the internet connection is not good, you can send your trip to DFO from the trip register by clicking on “SEND” button.

- On the next page, click on the “SEND TRIP TO DFO” button.

- And click on the “OK” button.

- Your trip now appears in the “SENT TRIPS” section. A green check indicates that your trip has been sent. To view the transmission, click on the “VIEW NKOUZU” button.

- The message “FULLY PROCESSED AND VALIDATED BY DFO” appears in the TRIP LOG at the bottom of the trip data page.
To return to the trip register, click on “Return to trip register”.

- The quota indicator is a feature created for competitive fisheries such as crabs. At the start of each season, enter your quota in your module settings. With each trip, you’ll see its progress. In the case illustrated here, the fisherman has caught over 57,000 kg of the 70,000 kg allocated to him. This information is only indicative and is not sent to DFO.

- You can individually close data groups for the following sections: Hail Out Call, fishing effort, bait, interactions, lost gear, inactivity period, arrival call, personal consumption. If you close them, make sure you have checked the data entered, as you will no longer be able to modify them. Example: in the Hail out call section, to close this section once completed, press the “CLOSE HAIL OUT call 1” button. A message appears on the screen to warn you that closing this dataset will prevent you from modifying it.
