Visual guides
STEP-BY-STEP
Discover step-by-step guides for each of JOBEL’s main functions.

Step 1 – Sign up
- Navigate to jobel.ca
- Click on the “SIGN UP” button at the top right of your screen.

- On the SIGN UP page, enter your FIN (Fisherman Identification Number) available on your fishing license.

- Enter test characters in uppercase.

- Click on the “NEXT” button.

- The “Terms and conditions” page appears. Read it and check the box to confirm that you have read the terms and conditions, then press the “NEXT” button.

- Complete the information related to your user profile.

- Create your password, enter it a second time to confirm it.

- Choose your security questions, they will be used to identify you when calling technical support.

- Write your answer for each of them.

- Click on the “LOGIN” button.

- Once you’ve registered, you’ll need an ELOG key. This identifier authenticates you to DFO as a unique user of this logbook. You’ll need your DFO Online Licensing System username and password.

- On the module page click on the message “Click here to get your Elog key”.

- The ELOG Key page explains how to obtain it. Click on the link: DFO ELOG KEY System”.

- On the Government of Canada page, click on the “English” button.

- On the Fisheries and Oceans Canada page, click on the “Proceed to CléGC” button to open a secure session.

- On the GCKey Welcome page, enter your username and password, then click on the “Sign in” button.

- On the Welcome page, click on the “Continue” button.

- On the two-factor authentication page, enter the one-time passcode you received in your mailbox or on the Authenticator application, then click on the “Continue” button. This code generally consists of 8 characters, including capital letters and numbers.

- For more information on how to obtain the single-use code, click on “How do I obtain this code?”.

- You will then receive a message telling you that authentication has been successful.

- Click on the “Continue” button.

- You are redirected to the Government of Canada/Electronic Logbook page. You can now Copy your ELOG Key by clicking on the “Copy Key To Clipboard” button.

Return to the JOBEL page, and click on the “PASTE” button to insert your ELOG Key.

- Your ELOG Key appears in the grey rectangle.

- To register your ELOG Key, click on the “SAVE THE KEY” button at the bottom of the page.

The message “Successfully saved” is displayed.

- The ELOG Key no longer flashes red and is properly registered.

Step 2 – Subscribe to a module
- Go to the MY MODULES screen from the JOBEL menu.

- Press the “ADD A MODULE” button.

- Press the “ORDER THIS MODULE FOR ONE YEAR” button corresponding to the desired module.

- In the order window, fill in the credit card information, and press on “Pay” button.

- A message appears informing you that your module has been activated.

- Once the transaction has been completed, you will be directed to the trip register page for the module you have just ordered.

- When you access a module, you are directed to the Trip Register page. Before you start your fishing trip, you must enter your settings. To do this, click on the “EDIT SETTINGS” button at the top of the page.

- The settings page appears. It contains all the information related to your fishing license. This information is only recorded at the time of registration. At the start of each season, all you have to do is update it.

- Fill in the Fishing type section. For lobster, only the DFO region is required.

- Fill in the Operator section. The Operator’s name is the name of the captain, and the Licence holder’s FIN.

- Fill in the Crew section. This feature allows you to register all your helpers for the entire season. It saves you having to fill in a paper crew register. Click on the “Add a crewman” button.

- Click on the “Add a crewman” button to add a fisherman’s assistant and complete the requested information. Repeat the operation as many times as necessary. They will be registered for the entire fishing season.

- The Number of crewmen will adjust automatically.

- Fill in the Vessel section: Vessel Registration Number and whether you have a Partnership agreement.

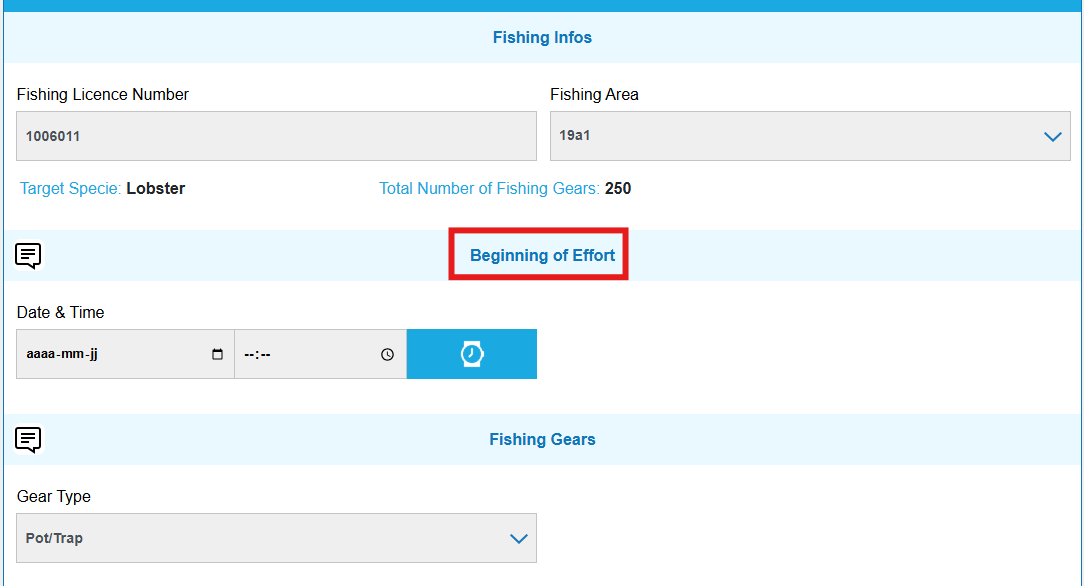
- Complete the Licenses section: Fishing licence Number, Target Specie, Fishing Area and Total Number of Gears. This information is available on your fishing license.

- Fill in the Baits section. This is the bait you use most frequently. This information can be changed in your trips.

- Fill in the Ports of departure and arrival section. Click on the blue arrows. In each menu, select the Region, Sub-region and Port.

- Depending on your module or fishing area, complete the Transfers section by answering the question “Will you be making transfers?”. Generally applies only to Anticosti area 17b

- Select the units of measurement you are most comfotable with: Pounds, Kilograms or both. Choose format for entering a geographic position: Degrees, Decimal minutes or Degrees, Minutes, Seconds.


- Click the “SAVE” button at the bottom of the page.

- If you forgot to fill in a field, it will be displayed in red. Complete it to save your data.

- When all the information is completed, a message confirms the saving of your data. Press “OK” to close it.

- When you access a module, you are directed to the trip register page. Once you’ve registered, you’ll need to enter your settings. To do this, click on the “EDIT SETTINGS” button at the top of the page.

- The settings page appears. It contains all the information related to your fishing license. This information is only recorded at the time of registration. At the start of each season, all you have to do is update it.

- In the Type of fishing section, enter the DFO Region, Gear Type (cone, Japanese or pyramid trap) and Target Species (snow crab, Lyre crab or rock crab). For each of these fields, click on the blue arrow, and select the appropriate information from the menu that appears.

- Fill in the Operator section: the Operator’s name is the name of the master operator, and the Licence holder’s FIN.

- Complete the Crew section. The Crew Register feature lets you register all your helpers for the entire season. It saves you having to fill in a paper Crew Register. Click on the “Add a crewman” button.

- Then complete the requested information: Name, FIN and Address (Optional). Repeat for each helper. They will be registered for the entire fishing season.

- The number of crewmen will be adjusted automatically.

- Fill in the Boat section: Boat Registration Number and whether you have a Partnership agreement.

- Fill in the Licences section: Fishing license number, Target species, Fishing area and Number of gears. This information is available on your fishing license.
The Fishing Quota field is a JOBEL feature. Enter the quota allocated to you, in kg or lb, and JOBEL will convert it. The quota indicator on the trip register page will progress each time you make a trip.

- In the Fishing Licence Conditions, answer the question “ Are you required to produce an inactivity report?”. If you answer “Yes” the question will appear in page 3 of the fishing effort. Consult your fishing conditions.


- Fill in the Fishing Gears section: select your trap size from the menu by clicking on the blue arrow.

- Fill in the Bait section. This is the bait you use most frequently. This information can be modified during your trip.

- Fill in the Ports of departure and arrival section. Click on the blue arrows. In each menu, select the Region, Sub-region and Port.

- Complete the Service providers section. In each menu, select the Hail Out call provider and then the Hail in call provider by clicking on the blue arrow.

- Select the units of measurement you are most comfortable with: Pounds, kilograms or both. Choose format for entering a geographic position: Degrees, Decimal Minutes or Degrees, Minutes, Seconds..

- Click on the “SAVE” button at the bottom of the page.

- If you forget to fill in a field, it will be displayed in red. Complete it, then press the “SAVE” button again.

- When all the information is complete, a message confirms that your data has been saved. Press “OK” to close it.

- When you access a module, you are directed to the Trip Register page. Before you start your fishing trip, you must enter your settings. To do this, click on the “EDIT SETTINGS” button at the top of the page.

- The settings page appears. It contains all the information related to your fishing license. This information is only recorded at the time of registration. At the start of each season, all you have to do is update it.

- Fill in the Fishing type section : DFO region, gear type, target specie and fishing gear.

- Fill in the Operator section. The Operator’s name is the name of the captain, and the Licence holder’s FIN.

- Fill in the Crew section. This feature allows you to register all your helpers for the entire season. It saves you having to fill in a paper crew register.

- Click on the “Add crewman” button to add a fisherman’s helper and complete the requested information. Repeat the operation as many times as necessary. They will be registered for the entire fishing season.

- Fill in the Vessel section: Vessel Registration Number and whether you have a Partnership agreement.

- Complete the Licenses section: Fishing licence Number, Target Specie, Fishing Area and Total Number of Gears. This information is available on your fishing license. The quota is optional.

- Answer the question about the inactivity report: Consult your fishing license.


- Complete the Ports Section by clicking on the blue arrow to select your landing port.

- Fill in the Service provider section. In each menu, select the Hail Out call provider and then the Hail in call provider by clicking on the blue arrow.

- Select the units of measurement for weight you are more comfortable with and format for geographic position.


- Click on the “SAVE” button at the bottom of the page.

- If you forget to fill in a field, it will be displayed in red. Complete it, then press the “SAVE” button again.

- When all the information is complete, a message confirms that your data has been saved. Press “OK” to close it.

- When you access a module, you are directed to the Trip Register page.
- Before you start your fishing trip, you must enter your settings. To do this, click on the “EDIT SETTINGS” button at the top of the page.

- The settings page appears. It contains all the information related to your fishing license. This information is only recorded at the time of registration. Update it at the start of each season.

- Fill in the Fishing type section: DFO region, gear type, target specie.

- Fill in the Operator section. The Operator’s name is the name of the captain, and the Licence holder’s FIN.

- Fill in the Crew section. This feature allows you to register all your helpers for the entire season. It saves you having to fill in a paper crew register. Click on the “Add a crewman” button.

- Click on the “Add a crewman” button to add a fisherman’s helper and complete the requested information. Repeat the operation as many times as necessary. They will be registered for the entire fishing season.

- Fill in the Vessel Registration Number in the Vessel section.

- Complete the Licenses section: Fishing licence Number, Target Specie, Fishing Area and Total Number of Gears. This information is available on your fishing license. The quota is optional.

- In the Fishing License conditions section, indicate if you must declare an Inactivity report. Consult your fishing license conditions.


- In the Ports section, indicate your landing port by clicking on the blue arrow .

- Fill in the Service provider section. In each menu, select the Hail Out call provider and then the Hail In call provider by clicking on the blue arrow.

- In the Units measurement section, select the unit of weight you are more comfortable with, and the format for geographic position.


- Click on the “SAVE” button at the bottom of the page.

- When all the information is complete, a message confirms that your data has been saved. Press “OK” to close it.

Step 3 – Data entry and transmission
- You are on the modules page. Click on the “LOBSTER” module.

- You are on the trip register page. The register is divided into 3 sections: Opened trips, Closed trips and Sent trips. To create a trip, click on the “ADD TRIP” button.

- Page 1 provides general trip information. Some information is filled in automatically from your settings, but you can modify it if necessary.

- This is the case for the Crew register. If one of your helpers is absent, you can delete it by clicking on the “REMOVE CREW MEMBER” button. It will only be deleted for this trip.

- Answer the question “Will you be using a carrier during this trip?”. If you do transfers, answer “YES”.

- When you have completed all the fields, go to the next page by clicking on the “NEXT” button.

- Page 2 contains information about the DEPARTURE.

- Set your departure date and time by clicking on the “Automatic clock” button.

- You can change the date and time manually. On your phone, click in the time field, the clock appears: choose “AM” or “PM” then enter the start time, and click on “Set” to save the data.

- The starting port is automatically filled in from your settings, but you can modify it by clicking on the blue arrow. Choose the right port from the menu that appears Click on the “NEXT” button to move on to the next page.

- Page 3 provides information about your fishing EFFORT.

- Enter the date and time of your departure by clicking on the “Automatic clock” button. You can change them manually.
- The Gear type is automatically filled in from your settings.

- Fill in the Effort Detail section. By default, the soak duration is 1 day, but you can modify it. The Number of gears hauled is filled in automatically from your settings, but you can modify it.

- Then complete the Catches section. Enter the weight in kilos or pounds, and JOBEL will convert it automatically.

- If you have Bycatches in your traps, click on the “ADD BYCATCH” button.

- Select the species by clicking on the blue arrow.

- Indicate the number of specimens discarded.

- Depending on your region, fill in the Special fields.

- If you’re making a second tow, click on the “ADD ONE EFFORT DETAIL” button and complete the information.

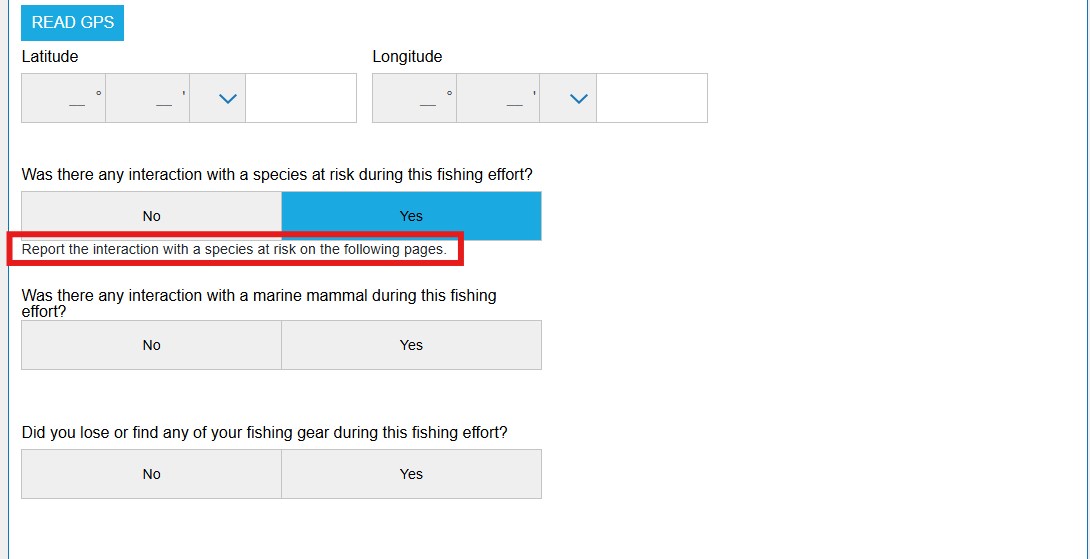
- Complete the End of effort information. Click on the “Automatic clock” button to enter the date and time, and on the “READ GPS” button to enter your end-of-effort position.

- Answer the questions about interactions with a species at risk, a marine mammal, and whether you’ve lost or found one of your fishing gear.

- If you answer “YES” a message appears asking you to complete the form that will appear on the following pages.
- For the period of inactivity, consult your fishing license to find out if you need to complete this form. (See our visual guides on how to declare interaction forms and lost/found gear).

- Page 4 concerns the Bait section. The bait type is filled in automatically from your settings, but you can modify it by clicking on the blue arrow. Complete all fields.

- If you are using several baits, click on the “ADD BAIT” button as many times as necessary, fill in the information, then click on the “NEXT” button.

- Page 5 provides information on ARRIVAL: the transfers section, personal consumption and the landing start date and time.

- If you answered “YES” to the question about transfers in the settings, and “YES” to the use of a carrier boat on page 1, the sections are displayed automatically. Transfers section only concern 17B area in Québec.

- Fill in the fields requested on the carrier loading.

- Complete the fields for the Transfer section.

- You can add as many transfers as you wish by clicking on the “ADD A TRANSFER” button.

- If you keep catches for personal consumptions, please indicate this by clicking on “ADD PERSONAL CONSUMPTION”.

- The section appears, select the species by clicking on the blue arrow, then enter the estimated weight you keep. Repeat the operation if you have a second personal use by clicking on the “ADD PERSONAL CONSUMPTION” button.

- Enter the Landing start date and time by clicking on the “Automatic clock” button. You can enter it manually as explained above. The port of arrival is filled in automatically from your settings, but you can change it by clicking on the blue arrow.

- When you have finished filling in the pages of your elog, click on the “REVIEW” button.

- You will be taken to the Trip data page, which summarizes all the information you have entered. Check that all the data you have entered is correct, as you can still modify it.

- If you have made a mistake, click on the “EDIT TRIP” button at the bottom of the page.

- You are redirected to the first page of the trip. You can go directly to the page where you need to make a correction by clicking on the numeric strip at the top right of the screen, or by clicking on the “NEXT” button at the bottom of the page.

- If, for example, you have made a mistake on the estimated kept weight of lobsters, go to page 3, make your correction, then click on the “NEXT” button to go to the last page of the trip (page 5). Click on the “REVIEW” button to return to the data page.

- If your trip information is correct, click on the “CLOSE TRIP” button.

- A message appears to confirm your trip is closed. Click on “YES”.

- Your trip is now closed. Click on “OK”.

- Your trip appears in the CLOSED TRIPS section. Click on “SEND” button.

- On the trip data page, click on “SEND TRIP TO DFO” button.

- The message “Trip being sent to DFO” appears, click on “OK”.

- Your trip now appears in the SENT TRIP section. A green mark indicates that your trip has been sent. To view the transmission, click on the “SEE RNBMHR” button.

- The message “Plearly processed and validated by DFO” appears in the Transmission Log at the bottom of the trip data page.

- The message “Plearly processed and validated by DFO” appears in the Transmission Log at the bottom of the trip data page.

- You can close data groups individually for the following sections: fishing effort, bait, interactions, lost gear, period of inactivity, transfers, personal consumption. If you close them, make sure you have checked the data entered, as you will no longer be able to modify them. Example: in the Bait section, to close this section once completed, press the “Close Bait 1” button.

- To return to the trip register, click on “Return to trip register”.

- On the modules page, select “CRABS”.

- You are directed to the trip register page. It consists of 3 sections: Open trips, Closed trips and Sent trips. To create a trip, click on the “ADD TRIP” button.

- Page 1 provides general trip information. Some information is filled in automatically from your parameters, but you can modify it if necessary.

- This is the case for the crew register. If one of your helpers is absent, you can delete it by clicking on the “REMOVE CREWMAN” button. It will only be deleted for this trip.

- Indicate whether “YES” or “NO” you have an observer on board.

- When you have completed all the fields, go to the next page by clicking on the “NEXT” button.

- Page 2 provides information on DEPARTURE.
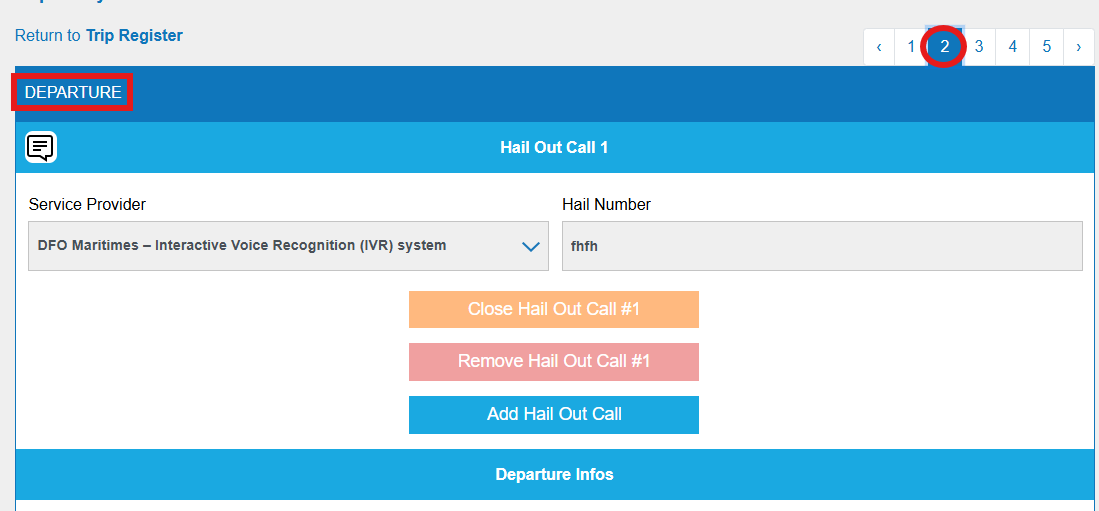
- The “Service provider” is automatically filled in from your settings, but you can modify it by clicking on the blue arrow. Then enter the “Hail number” provided by the company.

- Enter your departure date and time by clicking on the “Automatic clock” button.

- You can change the date and time manually. On your phone, click in the time field, the clock appears: choose “AM” or “PM” then enter the start time, and click on “Configure” to save the data.

- The starting port is automatically filled in from your settings, but you can change it by clicking on the blue arrow. Choose the right port in the menu which appears. Click on the “NEXT” button to go to the next page.

- Page 3 provides information about your fishing EFFORT.

- The gear details are filled in from your parameters but you can modify it.

- Complete the other information requested: Date and time, GPS position, soak duration, average gear depth…

- Fill in your catch information in Kg or pounds, and JOBEL will convert it.

- If you have Bycatches (that you cannot keep), indicate this by clicking on the “Add Bycatch” button.

- Fill in the fields requested: species and quantity discarded.

- If you make several Tows during your fishing effort, click on the “Save Tow 1” button.

- A box showing the first is displayed. Click on the “ADD TOW” button and fill in the required information as you did for the first tow.

- Then, complete the End of effort information. Click on the “Automatic clock” button to enter the date and time.
Then answer the questions about interactions with a species at risk, a marine mammal, and whether you have lost any of your fishing gear, as well as the inactivity report.
For the period of inactivity, check your fishing licence if you must declare this periode if you have an inactivity during your fishing trip.

- If you answer “YES”, a message will appear asking you to complete the form that will appear on the following pages (see visual guides for declaring interactions, gear loss and inactivity reports).

- If you make more than one fishing effort during your trip, click on the “Save effort 1” button.

- On the page that appears, click on the “ADD EFFORT” button.

- The effort page appears on the screen. Fill in the information as you did for the first effort.

- When you’ve finished to complete your efforts, click on the “NEXT” button.

- Page 4 concerns the Bait section. The bait type is filled in automatically from your parameters, but you can modify it by clicking on the blue arrow. Complete all fields.

- Page 5 provides information on ARRIVAL: arrival call and personal uses.

- In the Hail in Call section, the Service provider is filled in from your parameters, but you can modify it by clicking on the blue arrow. Enter the Confirmation number. The summary noted above is the information to be transmitted to your provider when you call.

- If you are keeping catches for personal consumption, please indicate this by clicking on “ADD PERSONAL USE”, and fill in the information requested: species, weight and forseen usage. If you have more than one species to declare, click on the “Add Personal Consumption ” button.

- When you have finished filling in the pages of your trip, click on the “REVIEW” button.

- You’ll be taken to the Trip data page, which summarizes all the information you’ve entered. Check that all the data you have entered is correct, as you can still modify it.

- If you have made a mistake, click on the “EDIT TRIP” button at the bottom of the page.

- You are redirected to the first page of the trip. You can go directly to the page where you need to make a correction by clicking on the numeric strip at the top right of the screen, or by clicking on the “NEXT” button at the bottom of the page until you get to the right page.

- If you’ve made a mistake about the amount of bait used, go to page 4, make your correction, then click on the “NEXT” button to go to the last page of the trip. And click on the “REVIEW” button to return to the data page.

- Now that your trip information is correct, click on the “CLOSE TRIP” button.

- Click “YES” to confirm trip closure.

- Your trip is closed, click on the “OK” button.

- Your trip will appear in the CLOSED TRIP section. Click on the “LANDING” button.

- Indicate the date and time of your arrival at the wharf, then the date and time of the beginning of your landing.

- The Weighings section lets you record your dockside weighing (which is not sent to DFO) and adjust the quota indicateur. You can see the progress of your quota in real time.
Once you’ve entered your landing data, click on the “CLOSE LANDING” button.

- If you have a good Internet connection, click on the “SEND TRIP TO DFO” button.

- If the internet connection is not good, you can send your trip to DFO from the trip register by clicking on “SEND” button.

- On the next page, click on the “SEND TRIP TO DFO” button.

- And click on the “OK” button.

- Your trip now appears in the “SENT TRIPS” section. A green check indicates that your trip has been sent. To view the transmission, click on the “VIEW NKOUZU” button.

- The message “FULLY PROCESSED AND VALIDATED BY DFO” appears in the TRIP LOG at the bottom of the trip data page.
To return to the trip register, click on “Return to trip register”.

- The quota indicator is a feature created for competitive fisheries such as crabs. At the start of each season, enter your quota in your module settings. With each trip, you’ll see its progress. In the case illustrated here, the fisherman has caught over 57,000 kg of the 70,000 kg allocated to him. This information is only indicative and is not sent to DFO.

- You can individually close data groups for the following sections: Hail Out Call, fishing effort, bait, interactions, lost gear, inactivity period, arrival call, personal consumption. If you close them, make sure you have checked the data entered, as you will no longer be able to modify them. Example: in the Hail out call section, to close this section once completed, press the “CLOSE HAIL OUT call 1” button. A message appears on the screen to warn you that closing this dataset will prevent you from modifying it.

- The species you can declare in this module are: Mackerel, Herring, Smelt, Gaspareau, and Capelin..
- On the modules page, select “SMALL PELAGICS”.

- You are directed to the trip register page. It consists of 3 sections: open trips, closed trips and sent trips. To create a trip, click on the “ADD TRIP” button.

- Page 1 provides general trip information. Some information is filled in automatically from your settings, but you can modify it if necessary.

- This is the case for the crew register. If one of your helpers is absent, you can delete it by clicking on the “DELETE CREWMAN” button. It will only be deleted for this trip.

- To move on to the next page, click on the “NEXT” button.

- Page 2 contains information about the START.

- Complete the hailout call information. The “Service provider” is automatically filled in from your settings, but you can change it by clicking on the blue arrow. Then enter the “Call confirmation number” provided by the company.

- Enter your departure date and time by clicking on the “Automatic clock” button. Click on the “NEXT” button to move on to the next page.

- Page 3 provides information about your fishing EFFORT.

- The gear type is filled in from your settings, but you can modify them by clicking on the blue arrow.

- Complete the other information.

- Fill in the catch information in Kg or pounds according to your settings, and JOBEL will convert it.

- Then complete the End of effort information. Click on the “Automatic clock” button to enter the date and time.
- Then answer the questions concerning interactions with species at risk, marine mammal, and whether you have lost any of your fishing gear, as well as the inactivity report if you have answered ”yes” in your settings.

- If you answer “YES” a message appears asking you to complete the form that will appear on the following pages. (See capsules for declaring interactions, gear loss and inactivity reports).

- When you have completed your fishing efforts, click on the “NEXT” button.

- Page 4 provides information on Arrival and Personal use.

- In the hailin call section, the Service Provider is filled in from your settings, but you can modify it by clicking on the blue arrow. Enter the Call Confirmation Number. The summary noted above is the information to be transmitted to your provider when you call.

- If you are keeping catches for personal consumption, click on “ADD PERSONAL Consumption”, and fill in the information requested: species, weight and foreseen usage. If you have several species to declare, click on “Add personal consumption”.

- When you’ve finished filling in your pages, click on the “REVIEW” button.

- This takes you to the Trip Data page, which summarizes all the information you have entered. Check that all the data you have entered is correct, as you can still modify it.

- If you have made a mistake, click on the “EDIT TRIP” button at the bottom of the page.

- You are redirected to the first page of the trip. You can go directly to the page where you need to make a correction by clicking on the numeric strip at the top right of the screen, or by clicking on the “NEXT” button at the bottom of the page.

- If, for example, you’ve made a mistake on the estimated kept weight, go to page 3, make your correction, then click on the “NEXT” button to go to the last page of the trip. Click on the “REVIEW” button to return to the data page.

- Now that your trip information is correct, click on the “CLOSE TRIP” button.

- Click “YES” to confirm.

- Your trip is now closed, click on the “OK” button.

- Your trip appears in the CLOSED TRIP section. Click on the “LANDING” button.

- Check the arrival port of your landing.
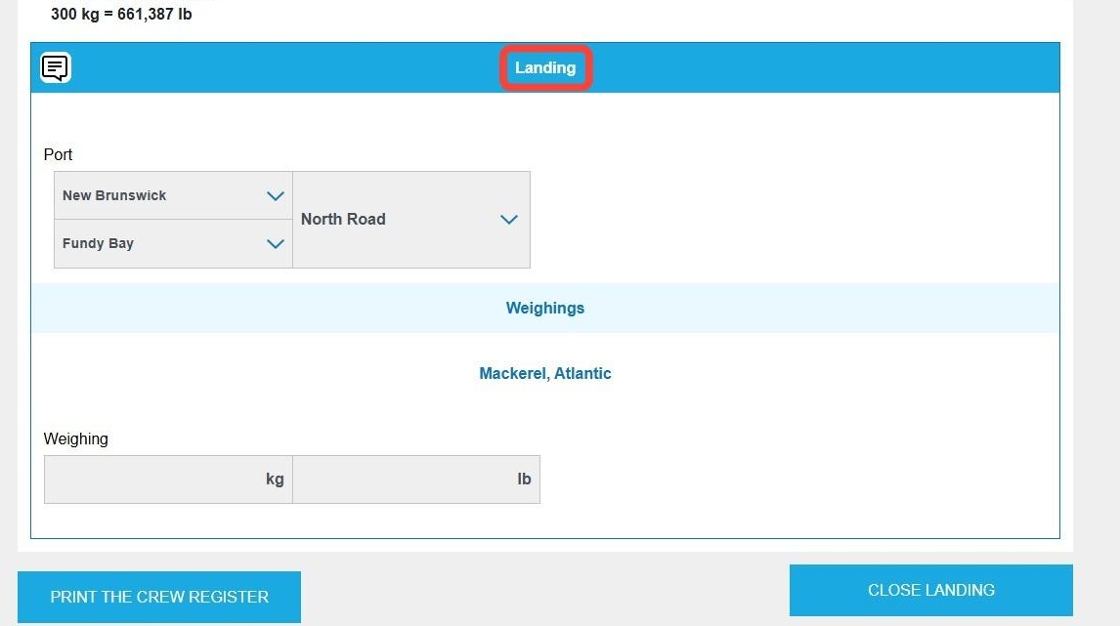
- The Weighing section allows you to record your dockside weighing (which is not sent to DFO).
- Once you have recorded your landing data, click on the “CLOSE LANDING” button.

- When you have a good Internet connection, click on the “SEND TRIP TO DFO” button.

- And click on the “OK” button.

- Your trip now appears in the “SENT TRIPS” section. A green mark indicates that your trip has been sent. To view the transmission, click on the “SEE RYUEEP” button.
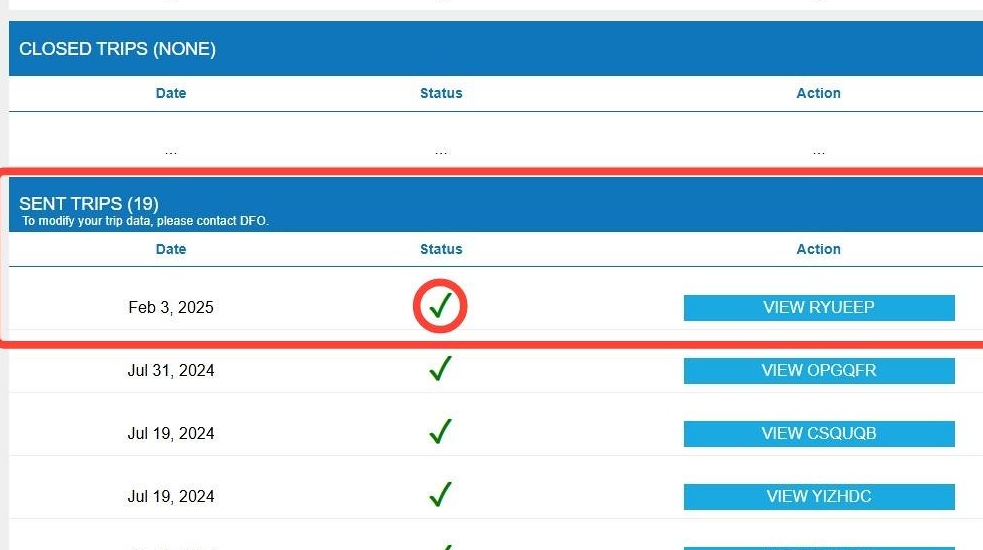
- The message “Fully processed and validated by DFO” appears in the TRANSMISSION LOG at the bottom of the trip data page. To return to the trip register, click on “Return to trip register”.

- You can individually close data groups for the following sections: HAilout and Hailin call, fishing effort, interactions, lost gear, inactivity period, personal consumption. If you close them, make sure you have checked the data entered, as you will no longer be able to modify it. Example: in the Hailout call section, to close this section once completed, press the “Close hail out call 1” button. A message appears on the screen, warning you that closing this data group means you will no longer be able to modify it.

- On the modules page you have subscribed to, select “GROUNDFISH”.

- You are directed to the trip register page. It consists of 3 sections: opened trips, closed trips and sent trips. To create a trip, click on the “ADD TRIP” button.

- Page 1 provides general trip information. Some information is filled in automatically from your settings, but you can modify it if necessary.

- This is the case for the crew register. If one of your helpers is absent, you can delete it by clicking on the “REMOVE CREWMAN” button. It will only be deleted for this trip.

- To move on to the next page, click on the “NEXT” button.

- Page 2 contains information about the START.

- Complete the hailout call information. The “Service provider” is automatically filled in from your settings, but you can change it by clicking on the blue arrow. Then enter the “Call confirmation number” provided by the company.

- Enter your departure date and time by clicking on the “Automatic clock” button. Click on the “NEXT” button to move on to the next page.

- Page 3 provides information about your fishing EFFORT.

- The gear type is filled in from your settings, but you can modify it by clicking on the blue arrow. Depending on the type of fishing Complete other requested information about the type of gears.

- Complete other information: Soak duration, Optimal depth catches and number of tows…

- Fill in the catch information. The estimated kept weight in Kg or pounds, and JOBEL will convert it.

- Then complete the End of effort information. Click on the “Automatic clock” button to enter the date and time.
- Then answer the questions concerning interactions with a species at risk, a marine mammal, and whether you have lost any of your fishing gear, as well as the inactivity report i you ansewer ”YES” in your settings.

- If you answer “YES” a message appears asking you to complete the form that will appear on the following pages. (Consult visual guides for declaring interactions, gear loss and inactivity reports).

- When you have completed your fishing efforts, click on the “NEXT” button.

- Page 4 provides information on Arrival and Personal use.

- In the hailin call section, the Service Provider is filled in from your settings, but you can modify it by clicking on the blue arrow. Enter the Call Confirmation Number. The summary noted above is the information to be transmitted to your provider when you call.

- If you are keeping catches for personal consumption, click on “ADD PERSONAL USE”, and fill in the information requested: species, weight and foreseen usage. If you have several species to declare, click on “Add personal use”.

- When you’ve finished filling in your pages, click on the “REVIEW” button.

- This takes you to the Trip Data page, which summarizes all the information you have entered. Check that all the data you have entered is correct, as you can still modify it.

- If you have made a mistake, click on the “EDIT TRIP” button at the bottom of the page.

- You are directed to first page of tour trip.

- If, for example, you’ve made a mistake on the personnal consumption estimated weight, go to page 4, make your correction, then click on the “NEXT” button to go to the last page of the trip. Click on the “REVIEW” button to return to the data page.

- Now that your trip information is correct, click on the “CLOSE TRIP” button.

- Now that your trip information is correct, click on the “CLOSE TRIP” button.

- Your trip is now closed, click on the “OK” button.

- Your trip appears in the CLOSED TRIP section. Click on the “LANDING” button.

- Indicate the landing date and time by cking to ”Automatic clock” button.

- The Weighing section allows you to record your dockside weighing (which is not sent to DFO).
- Once you have recorded your landing data, click on the “CLOSE LANDING” button.

- When you have a good Internet connection, click on the “SEND TRIP TO DFO” button.

- And click on the “OK” button.

- Your trip now appears in the “SENT TRIPS” section. A green mark indicates that your trip has been sent. To view the transmission, click on the “SEE IRSOMQ” button.

- The message “Fully processed and validated by DFO” appears in the TRANSMISSION LOG at the bottom of the trip data page.
- To return to the trip register, click on “Return to trip register”.

- You can individually close data groups for the following sections: Hail Out call, fishing effort, interactions, lost gear, inactivity period, arrival call, personal consumption. If you close them, make sure you have checked the data entered, as you will no longer be able to modify it. Example: in the Hailout call section, to close this section once completed, press the “Close hail out call 1” button. A message appears on the screen, warning you that closing this data group means you will no longer be able to modify it.

Additional reports
- To find out if you need to declare a period of inactivity during your fishing effort, refer to your licence conditions.
- Answer the question “Was there a period of inactivity during this fishing effort?” on page 3 of your trip. If you answer “YES”, you will be prompted to complete the declaration.

- Click on the “NEXT” button to continue your trip.

- The Inactivity Report section appears on page 5 of your trip.

- Click on the “Add PERIO” button.

- Fill in the required fields.

- Click on the “NEXT” button to complete the rest of your trip.

- In the trip data page, the Inactivity Period section appears. The declaration will be sent to DFO when the trip is dispatched.

- This is for Fishermen who are unable to fish during all or part of the fishing season. Please refer to your license conditions. To do so, in the main menu at the top of the page, click on “INACTIVITY REPORTS”.

- You are directed to the report register page. It consists of 3 sections: Open reports, Closed reports and Sent reports.

- To create a report, click on the “ADD REPORT” button.

- A report consists of a data entry page and a review page.

- The first section gathers report Identification information: Unique report ID, JOBEL version, supplier and report creation.

- Complete the General Information section: DFO Region, Operator’s name, License holder’S FIN, Vessel name and Number.

- Complete Inactivity information: Fishing license number, Start and End of Inactivity Period, and Reason for inactivity.

- For date and time fields, click on the “Automatic clock” button, or fill them in manually by clicking on the small calendar and dial.

- You can delete this period by clicking on the “Delete period 1” button.

- You can add a period by clicking on the “Add period” button.

- When you have completed all the requested information, click on the “REVIEW” button.

- You are taken to the report data page. This brings together all the information previously recorded.

- If you’ve made a mistake, you can change it by clicking on the “EDIT REPORT” button at the bottom of the page.

- When all the information has been checked, click on the “CLOSE REPORT” button at the bottom of the page.

- A message appears asking you to confirm the report closure. Click “YES” if everything is correct.

- A message confirms that the report has been closed successfully. Click on the “OK” button.

- Your report is in the CLOSED REPORTS section. Click on the “SEND REPORT” button.

- Click on “SEND REPORT” button on the details report page.

- Click the “OK” button on the message that appears.

- Your report is now in the SENT REPORTS section. A green check mark indicates that it has been processed successfully. If you wish to see the details of the report, click on the “VIEW REPORT” button.

- The transmission log confirms that the report has been processed and validated by DFO.

- To return to the report register, click on the “Return to report register” button.

- If you had an interaction with a marine mammal, answer “YES” to the question “Was there an interaction with a marine mammal during this fishing effort?” on page 3 of your trip. The message asking you to complete the declaration will appear.

- The declaration form appears on page 5 of your trip.

- Fill in the required fields. The Other identification number is reserved for DFO.

- Various information concerning the circumstances of the interaction with the marine mammal will be requested: description of the location and the mammal, whether any gear was damaged, the animal’s condition…

- Answer the questions detailing your interaction: videos, photos, samples, location description, body length…

- Complete the Incident type section by clicking on the blue arrow.

- Check the information in the Identification section and correct it if necessary.

- You can report another interaction by clicking on the “ADDING INTERACTION” button and filling in the required information.

- Click on the “NEXT” button to complete your trip.

- The trip data page displays the marine mammals interaction form you completed on page 5. It will be sent to DFO when the trip is dispatched.

- The transmission table confirms submission of form 222 Marine Mammals Interaction.

- If you had any interaction with a species at risk, answer “YES” to the question “Was there any interaction with a species at risk during this fishing effort?” in page 3 of your trip. The message asking you to complete the section will appear.

- Page 5 of your trip displays the Species at Risk Interaction Form.

- Fill in the required fields: Specimen condition, Estimated Specimen Quantity…

- If you have had several interactions with species at risk, click on the “ADD AN INTERACTION” button and complete the fields.

- Click on the “NEXT” button to complete your trip.

- The species at risk interaction section is displayed on the trip data page. It will be transmitted to DFO when the trip is sent.

Other useful guides
- To display JOBEL’s main menu on your tablet or computer, click on “Welcome ..”.
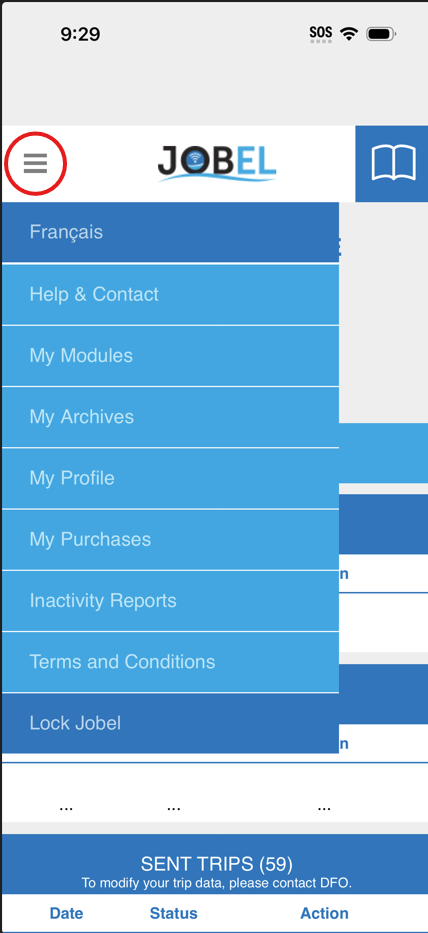
- To display JOBEL’s main menu on your smartphone, click on the 3 horizontal gray bars at the top left of your screen.
- JOBEL is available in English and in French.
- The “Help and contact” button will take you to the Jobel technical support contact page.

- Technical support hours and phone numbers are displayed here.

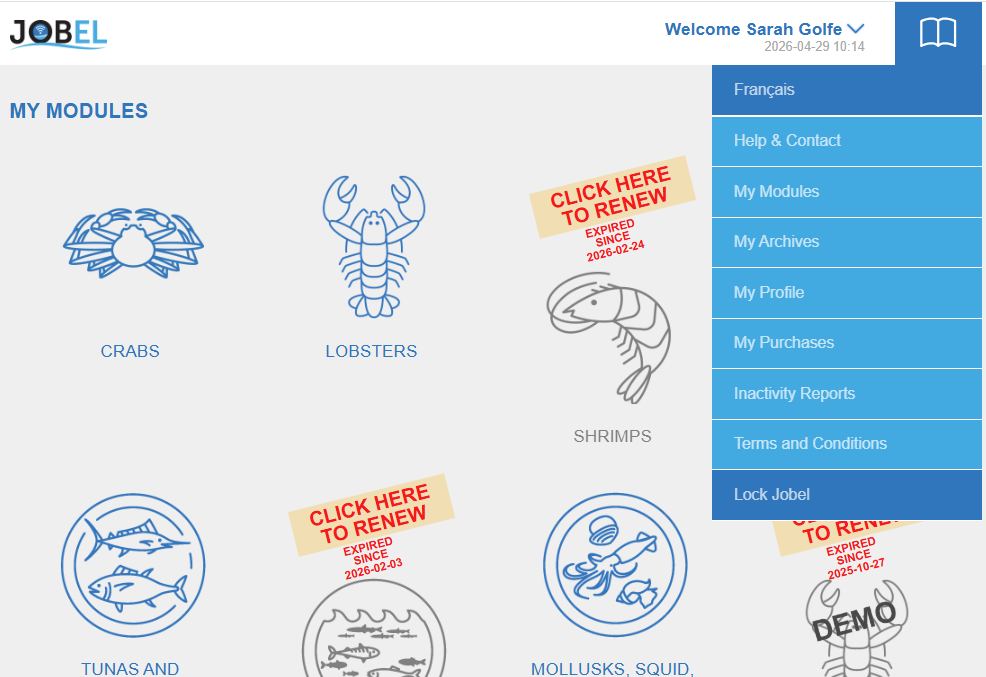
- The “My modules” button takes you to your subscribed modules page.
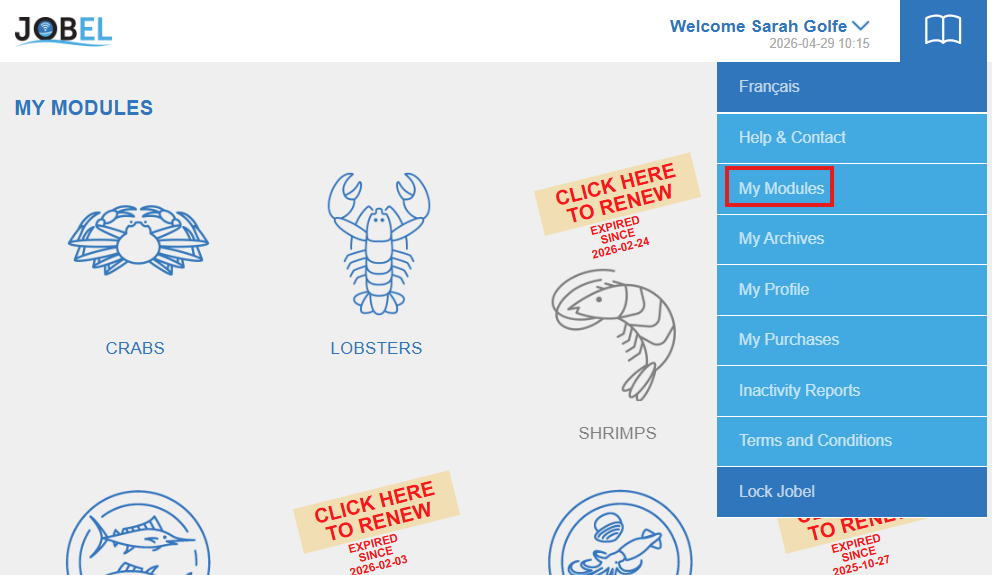
- If you wish to subscribe to a new module, click on the “ADD A MODULE” button.

- The “My archives” button takes you to the archives page, where you can consult the history of your fishing trips in previous years

- The archive page is displayed. You can consult the travel history of the desired module by clicking on its icon.

- The Lobster Archives page appears. You can either choose a set period or customize your search by clicking on the blue arrow.

- Click on the “Search” button to display your selection.

- The “My profile” button takes you to the user profile page.

- It consists of 3 tabs: ACCOUNT, GPS, ELOG Key.

- The Account page contains all your personal information: first and last name, e-mail and postal address, telephone number, security question…

- You can change your password from this page by clicking on the “Change password” button.

- On the edit page, enter a new password and click on the “SAVE NEW PASSWORD” button.

- The message “Registered successfully” appears. Click on the “OK” button.

- The GPS page lets you check that GPS is enabled on your device.

- Click on the “READ GPS” button. Consult “how to activate GPS on iPhone/Android” if necessary.

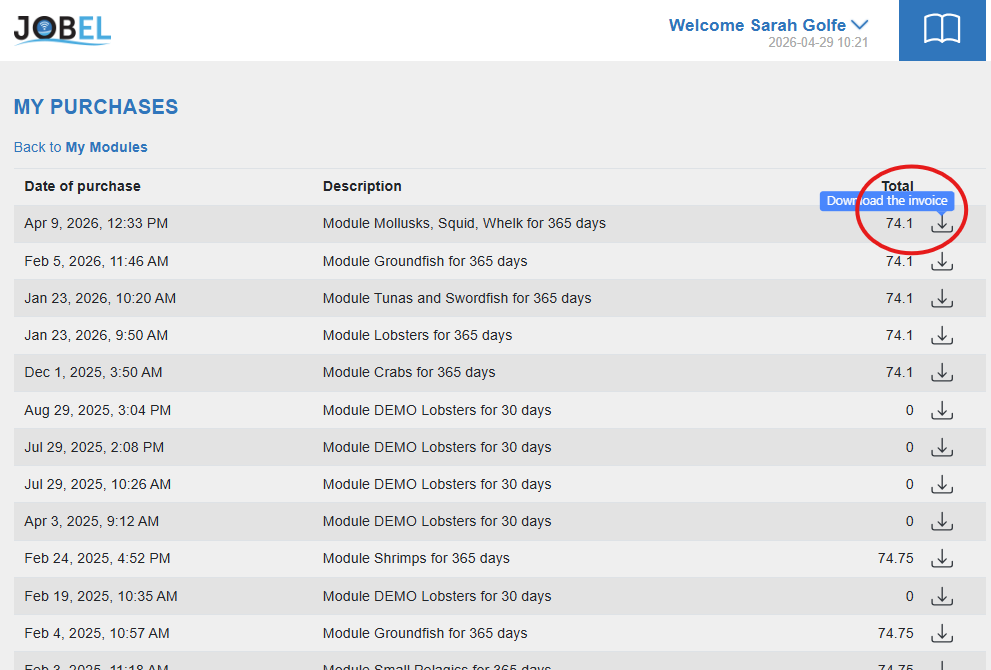
- The “Subscription receipts” button will take you to your invoices page.

- The page displays your payment history. You can print them out by clicking on the “DOWNLOAD THE INVOICE” button of the invoice of your choice.
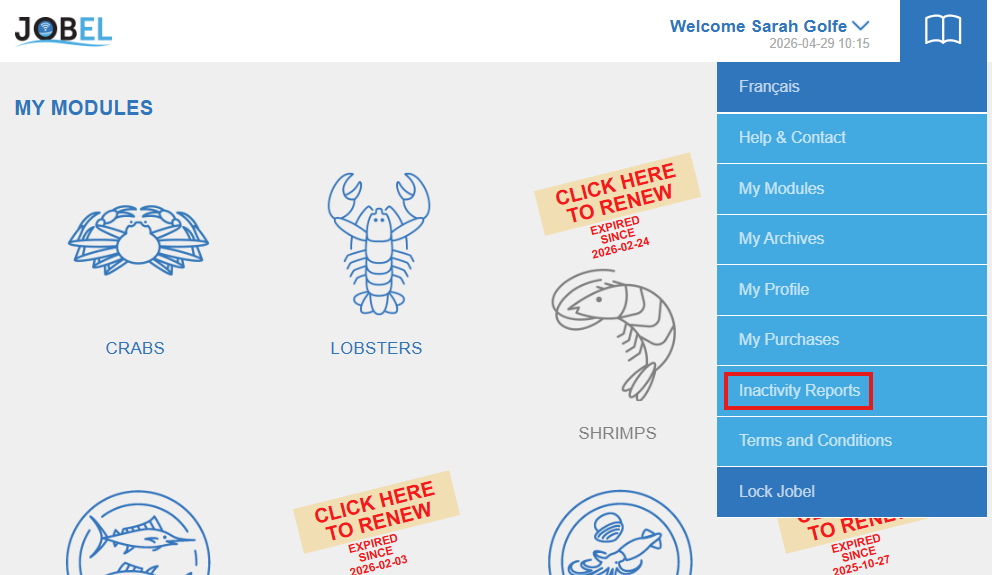
- The “Inactivity report” button will take you to the report register if you need to declare a period of inactivity.
- The “Terms and conditions” button will take you to the report Terms and condition page


- The “BOOK” button gives you access to the Help & Contact page and the User Guide.

- On your phone’s home screen, click on the browser “SAFARI”.

- In the search bar, type “jobel.ca“.

- And click on “Go“.

- On the home page of the website, click on the “SIGN UP” or “SIGN IN” button, depending on whether or not you are registered.

- Log in to your JOBEL account by entering your login details, then click on the “LOG IN” button.

- Once you’ve logged into your JOBEL account, you can now install the application on your phone’s home screen. To do this, click on the 3 black dots in the white circle at the bottom of your screen.
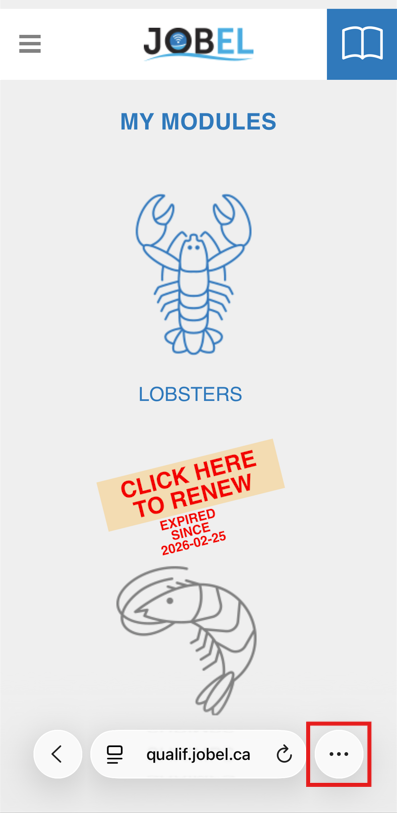
- In the menu, click on ” Share”.
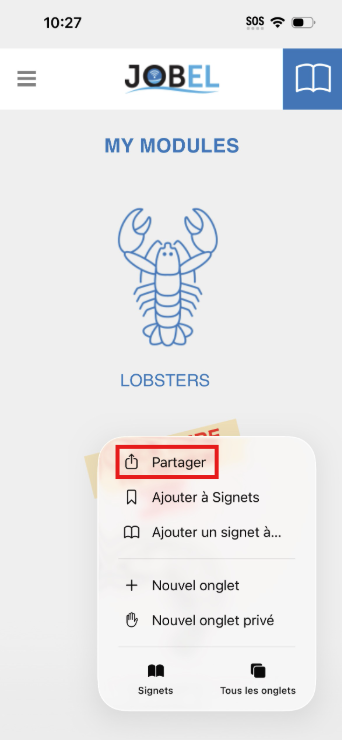
- Then select “Add to Home Screen” from the menu.

- Confirm installation by clicking on “Add”.

- The JOBEL icon is now on your phone’s home screen. By clicking on it, you’ll be taken directly to the trip or module register page.

- On your phone’s home screen, go to the “CHROME” browser.

- In the search bar at the top of the screen, type “Jobel.ca”.

- Click on “Jobel, un journal de bord électronique“.

- Click on “Sign up“.

- Enter your login details if you’re already registered, then click on the “LOG IN” button.

- You’re now on the modules page. To install JOBEL on your home screen, click on the 3 small white dots at the top right of your screen.

- In the menu that appears, click on “Add to home screen”.

- Select “Install”.

- Click on “Install”.
- JOBEL is now displayed in your applications.

- If you wish to display it on your home screen, press the JOBEL icon a little harder for a few seconds to bring up the installation window, then click on “Add to Home”.

- JOBEL is now installed on your home screen.

- To make sure your iPhone’s GPS is activated, click on JOBEL’s main menu. To do this, click on the 3 horizontal gray bars at the top left of your screen. Then select the “MY PROFILE” button.

- On the profile page, click on the “GPS” tab.

- Click on “READ THE GPS” button. In this case, GPS is not activated, and the message “JOBEL must authorized to access your GPS” is displayed.

- First possibility: click on the square on the right top corner of your screen.

- Click on the 3 small dots at bottom right.

- Click on “Location”.

- Click on “Allow” .

- Click on the “Done” button to confirm.
<
- Refresh the page cliking the circle arrow on the top right corner, and click on “Read GPS” button. If it still doesn’t work, you need to activate it in the phone settings.

- Second Poosibilty: return to your IPHONE home screen, and click on the Settings icon.

- In the menu, scroll down and click on the “Privacy and Security” button.

- Click on the “Location Services” button.

- In the new page, click on the “Safari websites”.

- Select «While using the App».

- Refresh the page cliking the circle arrow on the top right corner, and click on “Read GPS” button. Positions appear in the fields.

- Click on the 3 small gray bars to display the main menu.

- From the menu, select “My profile”.

- On the profile page, click on the “GPS” tab.

- To test the location function, click on the “READ GPS” button.

- If the location function is not enabled, a message appears asking you to authorize Chrome to access the device’s location. Select “When using the application”.

- Then click on “Turn on” or “Activate”.

- Latitude and longitude are displayed.
